Add Local User with PowerShell
Share Box
This tutorial demonstrates how to efficiently add a local user to Windows Server 2025 using PowerShell. By leveraging PowerShell, administrators can quickly create user accounts with advanced configurations, such as password policies and administrative privileges. This method is particularly effective when managing multiple users or automating user creation tasks.
Add Local User Using PowerShell
The PowerShell method offers a fast and streamlined way to add users with specific settings, such as password restrictions and administrative rights.
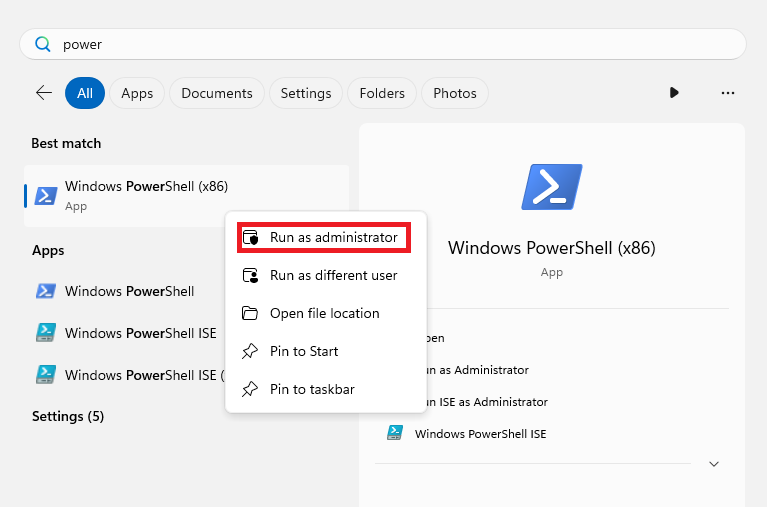
Open PowerShell with Administrator Privileges:
To begin, you’ll need to launch PowerShell as an administrator. Follow these steps:
- Click on the Windows icon and type PowerShell in the search bar.
- Right-click Windows PowerShell and select Run as Administrator.
By running PowerShell as an admin, you gain the necessary permissions to add users and manage user settings.
Create a new local user:
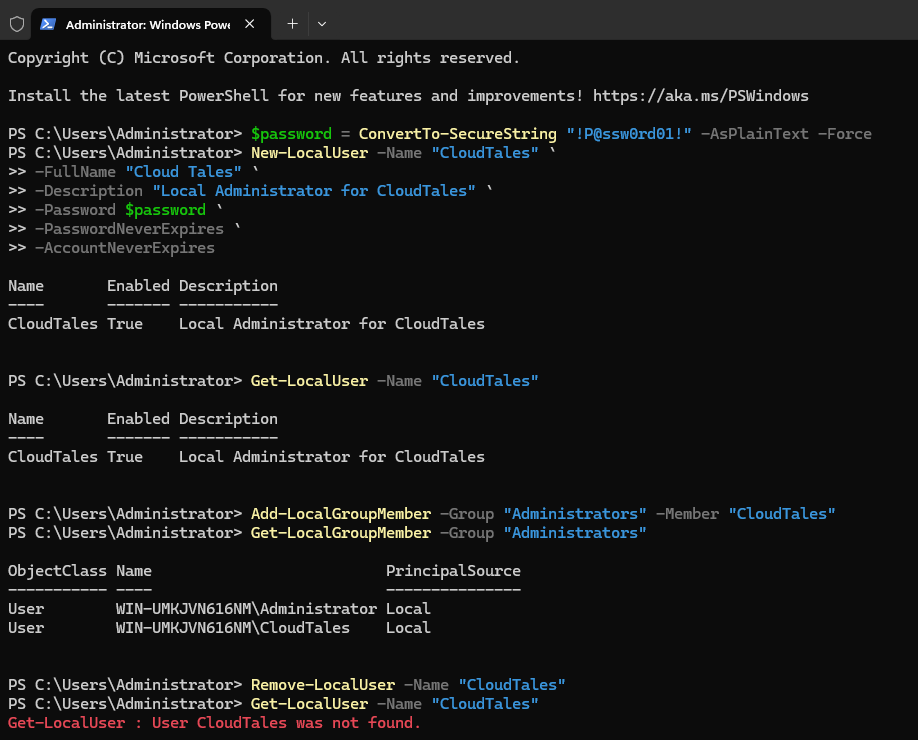
- Once PowerShell is open, you can add a new user by executing the following command. In this example, we are adding a user named CloudTales with the password! P@ssw0rd01!. You can replace these details with your own.
$password = ConvertTo-SecureString "!P@ssw0rd01!" -AsPlainText -Force
New-LocalUser -Name "CloudTales" `
-FullName "Cloud Tales" `
-Description "Local Administrator for CloudTales" `
-Password $password `
-PasswordNeverExpires `
-AccountNeverExpires
This command creates a new user named CloudTales, assigns a password, ensures the password never expires, and prevents the account from expiring. This is ideal for administrative users who need constant access without having to update credentials frequently.
Verify the user has been created:
- After creating the user, it’s important to confirm that the account was added successfully. Run the following command to verify:
Get-LocalUser -Name "CloudTales"If the user was created correctly, the details will be displayed in the PowerShell output.
Add the user to the Administrators group:
- Next, to grant CloudTales administrative privileges, add the user to the Administrators group. Execute this command:
Add-LocalGroupMember -Group "Administrators" -Member "CloudTales"This step ensures that the user has full administrative rights on the system, allowing them to perform higher-level tasks.
Check group membership:
- To confirm that the user has been added to the Administrators group, run the following command:
Get-LocalGroupMember -Group "Administrators"This command will list all members of the Administrators group, and you should see CloudTales among them.
Remove the user (if needed):
If, at any point, you need to remove the user account, simply run the following command:
Remove-LocalUser -Name "CloudTales"This command will delete the CloudTales account from the system.
Example:
Here’s an example of what the output looks like in PowerShell when the commands are executed correctly.
Conclusion
Using PowerShell to add a local user in Windows Server 2025 is an efficient method that offers greater control and flexibility. This approach not only simplifies the process of user creation but also makes managing passwords and group assignments much easier. For administrators managing large numbers of accounts or automating repetitive tasks, PowerShell is an indispensable tool.
References:
For further reading, visit the official Microsoft PowerShell Documentation.